Getting Risk Management Running on Your Coffee Break
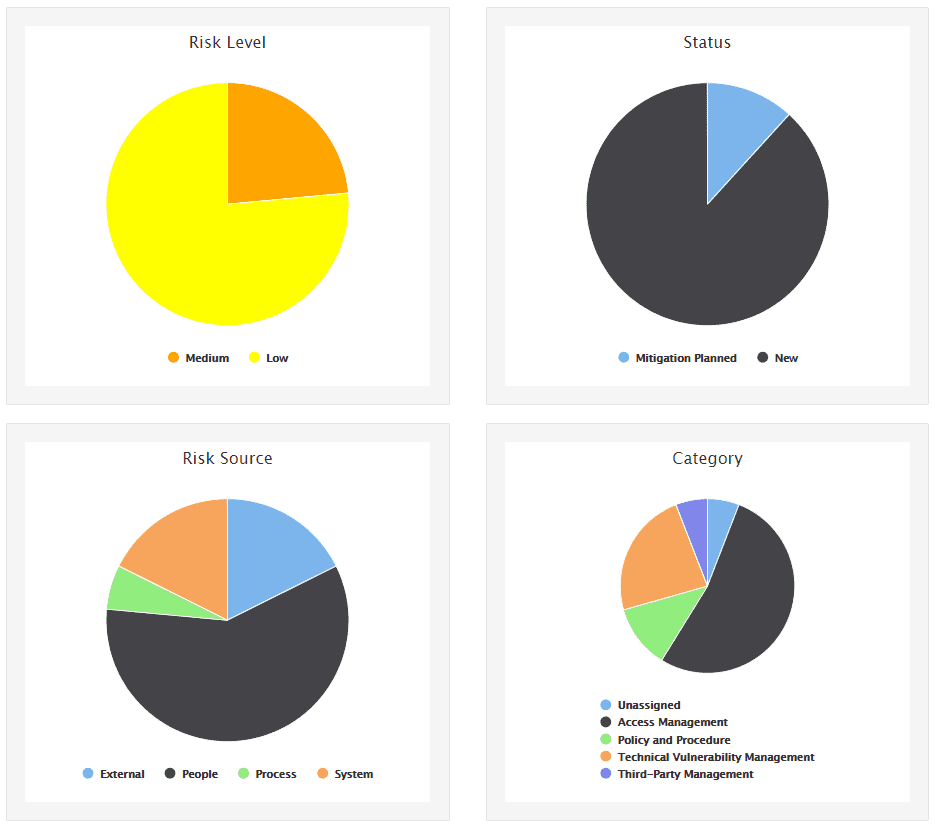
In this post we'll be using SimpleRisk a risk management and compliance tool. This tool tracks your assets, establishes a history of identified risks. It establishes a cadence for leadership to accept or remediate organization risks. Good stuff.
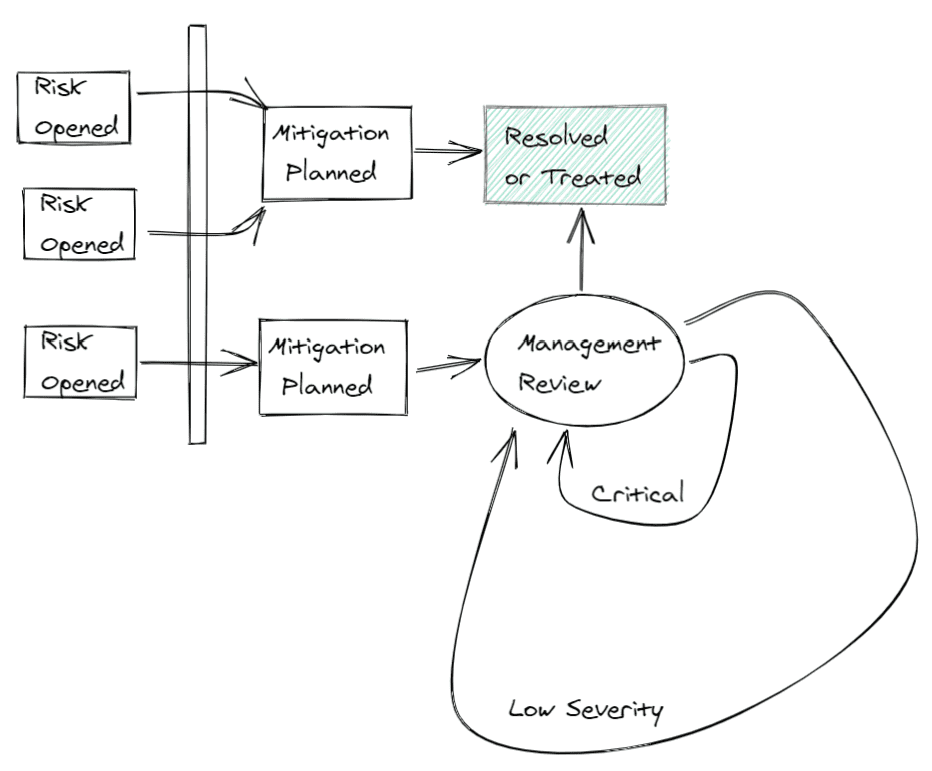
SimpleRisk uses a weak copy-left license (Mozilla Public License, version 2.0), and lets you get all the core functionality for free. It even throws in some common frameworks and assessments if you register with them. I recently got a customer up and running on this platform and it was painless. So here's their journey to better security health:
The nice thing about this as well is that it also for the acceptance of a risk (for some given period of time). This allows healthy prioritization for an organization while knowing where the risks lie:
Goals
So, all that's great. Let's walk through what we'll be looking to do here:
☐ Able to self deploy in 20 minutes
☐ Able to use a custom domain name and SSL certificate
☐ Have a quick process for renewing these certificates.
☐ Backup the information on the container
Certificate
Lets start with the easy items. Assuming you've got docker up and running, let's grab the most recent copy of certbot and bring that down. This is the engine we'll be using the generate our Let's Encrypt SSL certificates.
docker pull certbot/certbot

Using default tag: latest
latest: Pulling from certbot/certbot
801bfaa63ef2: Pulling fs layer
# --Snip --
Status: Downloaded newer image for certbot/certbot:latest
docker.io/certbot/certbot:latest
We then need to choose a domain name we'll be using for our certificate. Jump onto your DNS provider of choice, and create a CName Record like so:
| Host | Value | TTL |
|---|---|---|
| simplerisk | My server's external IP address | Default |
Leave the DNS provider's page open, this will come in handy in a moment as we now are going to generate a certificate signing request using our new certbot image. Here's the command with some explanation inline:
docker run -it --name certbot certbot/certbot \ # Boot the container in interactive mode
        certonly \ # Pass the certonly parameter to certbot, No auto certificate for us.
        --manual \ # We'll interact with certbot to approve the cert
        --email Team@bevel.work \ # Email to associate with the certificate.
        --agree-tos \ # Terms of service
        --preferred-challenges dns \ # We'll use a TXT record to authenticate
        -d simplerisk.bevel.work # The domain we'll be using
Here's a version that will actually run (sans comments).
docker run -it --name certbot certbot/certbot \
        certonly \
        --manual \
        --email Team@bevel.work \
        --agree-tos \
        --preferred-challenges dns \
        -d simplerisk.bevel.work
Answer the prompt(s) for email, and ip logging with Yes/No, and we'll have what we need for the TXT record:
Performing the following challenges:
dns-01 challenge for simplerisk.bevel.work

- - - - - - - - - - - - - - - - - - - - - - - - - - - - - - - - - - - - - - - -
Please deploy a DNS TXT record under the name
_acme-challenge.simplerisk.bevel.work with the following value:

N-7fam7pLfDsMHN9SG9podsLb0Kps8-s_WOm9VjPRy4

Before continuing, verify the record deployed.
- - - - - - - - - - - - - - - - - - - - - - - - - - - - - - - - - - - - - - - -
Press Enter to Continue
Sweet, drop that into the DNS provider which will look something like this in my case:
| Hostname | Value | TTL |
|---|---|---|
| _acme-challenge.simplerisk.bevel.work | N-7fam--Snip--Ry4 | Default |
Then give it about 5 minutes to propagate out and hit enter. Don't rush this step. Go get a ☕, it sucks if you have to wait for this one to timeout and send a new one out (Remember that default TTL? It may be set at 30 minutes.) YMMV.
After that completes, you'll get a message congratulating you. Now we'll need to go snag the certificates that are currently still stuck in that container.
Run the following to drag them to your host:
docker cp certbot:/etc/letsencrypt simple_risk_certs
So this will copy from the container onto our host a folder ./simple_risk_certs/. By navigating to ./simple_risk_certs/archive you'll see your certificate .pem files.
So now we've got our certificate ☑️️.
Grab a Simple Risk Image
So we want to change some of the default setting SimpleRisk uses, such as:
- The hostname
- The SSL certificate
To do this we'll make a few modifications to the Dockerfile. We then can build the image locally. Alright let's get started.
First we'll need to grab the Dockerfile, and a few common files the Dockerfile depends on. (Note: I'm doing this as of 2021/02/05 and the latest version they have is Ubuntu' Focal)
mkdir common
curl https://raw.githubusercontent.com/simplerisk/docker/master/simplerisk/focal/Dockerfile > Dockerfile
curl https://raw.githubusercontent.com/simplerisk/docker/master/simplerisk/common/foreground.sh > ./common/foreground.sh
curl https://raw.githubusercontent.com/simplerisk/docker/master/simplerisk/common/envvars > ./common/envvars
curl https://raw.githubusercontent.com/simplerisk/docker/master/simplerisk/common/start.sh > ./common/start.sh
curl https://raw.githubusercontent.com/simplerisk/docker/master/simplerisk/common/000-default.conf > ./common/000-default.conf
curl https://raw.githubusercontent.com/simplerisk/docker/master/simplerisk/common/default-ssl.conf > ./common/default-ssl.conf
curl https://raw.githubusercontent.com/simplerisk/docker/master/simplerisk/common/supervisord.conf > ./common/supervisord.conf
At the end of this you should have a Dockerfile in your current directory and a few files within the ./common folder.
We're going to add three lines to the Dockerfile right before the final CMD statement. Looking like this:
# editing: ./Dockerfile

# --Snip--
# Copy the certificates and rename them inside the image
COPY simple_risk_certs/archive/simplerisk.bevel.work/privkey1.pem /root/certs/simplerisk.key
COPY simple_risk_certs/archive/simplerisk.bevel.work/fullchain1.pem /root/certs/simplerisk.crt

# Add the servername into the Apache default configuration
RUN echo 'ServerName simplerisk.bevel.work' >> /etc/apache2/apache2.conf

# Start Apache and MySQL
CMD ["/bin/bash", "/start.sh"]
Aside: Generally it's not the best idea to inject your certificates into the image itself. There are also a myriad of secret management tools out there. Let's say 'Don't share this image' or 'Don't post this to DockerHub' and move along.
Next, add this ServerName field to the VirtualHost declaration as well. This step is not required , but is helpful when trying to reverse engineer later:
# editing: ./common/default-ssl.conf
# --Snip--
<VirtualHost *:443>
        DocumentRoot /var/www/simplerisk
        <Directory "/var/www/simplerisk">
                AllowOverride all
                allow from all
                Options -Indexes
        </Directory>
        ServerName simplerisk.bevel.work
# --Snip--
Note: we're adding the line ServerName simplerisk.bevel.work
So we've got our config ready to build, go ahead and build your image by running:
docker build -t simplerisk .
Time for a ☕. But we've now got our image ready to go ☑️.
Deploy
Now with a one-liner we get up and running. Here's a quick breakdown followed by a runnable version:
docker run -d # Run in Daemon mode or in the background
            -p 8080:80 # Expose the host's port 8080 to container port 80
            -p 44443:443 # Host:44443 Container:443
            --name simplerisk # Name the container
            simplerisk # What image to user
docker run -d -p 8080:80 -p 44443:443 --name simplerisk simplerisk
Boom, we're running with https://localhost:44443, note that the default admin credential is set up as:
| User | Password |
|---|---|
| admin | admin |
The Firewall Step
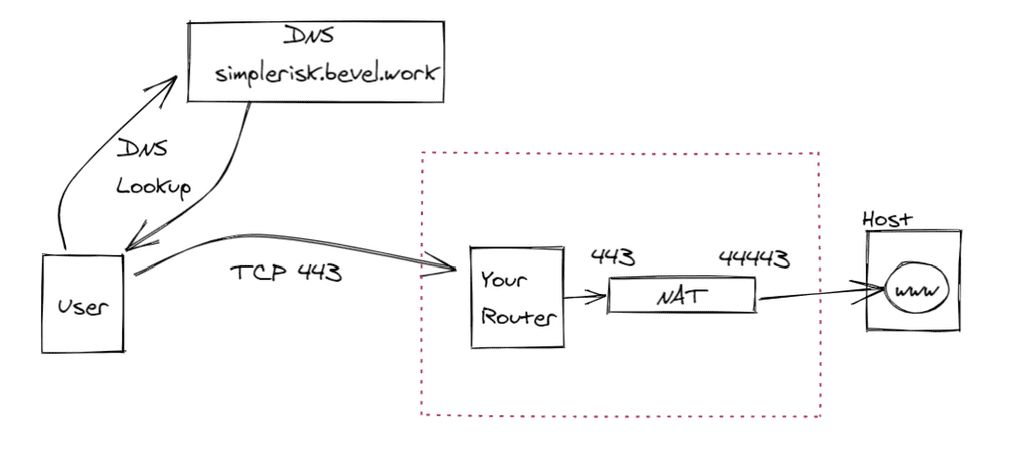
One thing I'm not going to cover here is to make sure your router/firewall are allowing the traffic in. You'll need to:
- Establish what
IP addressyou'll use - Make sure your router associates that traffic with the right host
- Build a the port mapping or
NATto get your End-user'sTCP 443traffic to your docker host'sTCP 44443port.
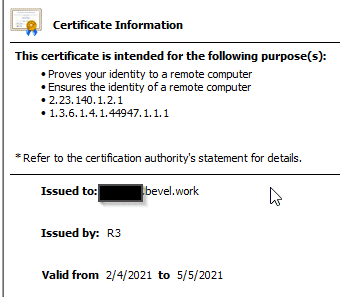
This process isn't difficult, but describing it here would not age well. After completing these steps you can see your site is up and the certificate installed. Navigate to your DNS address with a web browser, in my case: https://simplerisk.bevel.work. Here's an image of the certificate info:
Closing
Let's review our goals:
☑️ Able to self deploy in 20 minutes
☑️Able to use a custom domain name and SSL certificate -- Easy with Certbot
☑️ Have a quick process for renewing these certificates. -- Easy with Certbot
☑️ Backup the information on the container -- Done by default with the volume declarations in the Dockerfile
Thanks to the team over at SimpleRisk for the tool and your work. Go give them money if your organization can support it.
Postscript
We hope this article has been helpful. If you see something we should correct or update, want to offer a counter example, or if you want to talk to Bevel Work about a problem we can help your organization with, reach out to us here.


